What Exactly Is A Cone Pyrometric Pack?
Cone packs contain three to four clay cones. Each cone is numbered according to the Orton temperature rating. Pyrometric cones (or witness cones) should be placed in the kiln so they will not touch anything and are visible through the peephole. The cone pack can have an area at the end to melt (the cone bends) into called a boat. After firing, the target cone will be bent to 90 degrees, showing a successful firing.
Cone packs usually come in a box of 50, low fire packs with cone 07, cone 06, cone 05, and cone 04, and lastly high fire packs of cone 4, cone 5, cone 6, and cone 7. The cone number is important and correlates to how much heatwork is needed to vitrify your artwork or pottery.
Cone packs are sometimes made from the same clay materials as the clay and glazes you are firing. This is important because you should never fire a low fire cone pack when also firing high fire clays. The entire cone pack will be melted.
It is not recommended to break large cones for use in a kiln sitter. Instead you should use Orton small pyrometric cones (small cone) specifically designed for kiln sitters. The small cones are designed to break (weight of the kiln sitter’s sensing rod is a factor here) and turn off your kiln. For me, I use an electric kiln, not a manual kiln. I have an electronic controller. I have no need for small cones to be used in a kiln sitter. In my opinion this is a big advantage and makes firing easier.
How Many Cones Should You Use?
Typically, three pyrometric cones are arranged in a row. Each of these three cones has a unique grade and purpose. The target cone is the cone in the center. The center cone is the temperature at which your kiln should be fired. So, if you’re firing to cone 06, the center cone, is a 06 cone.
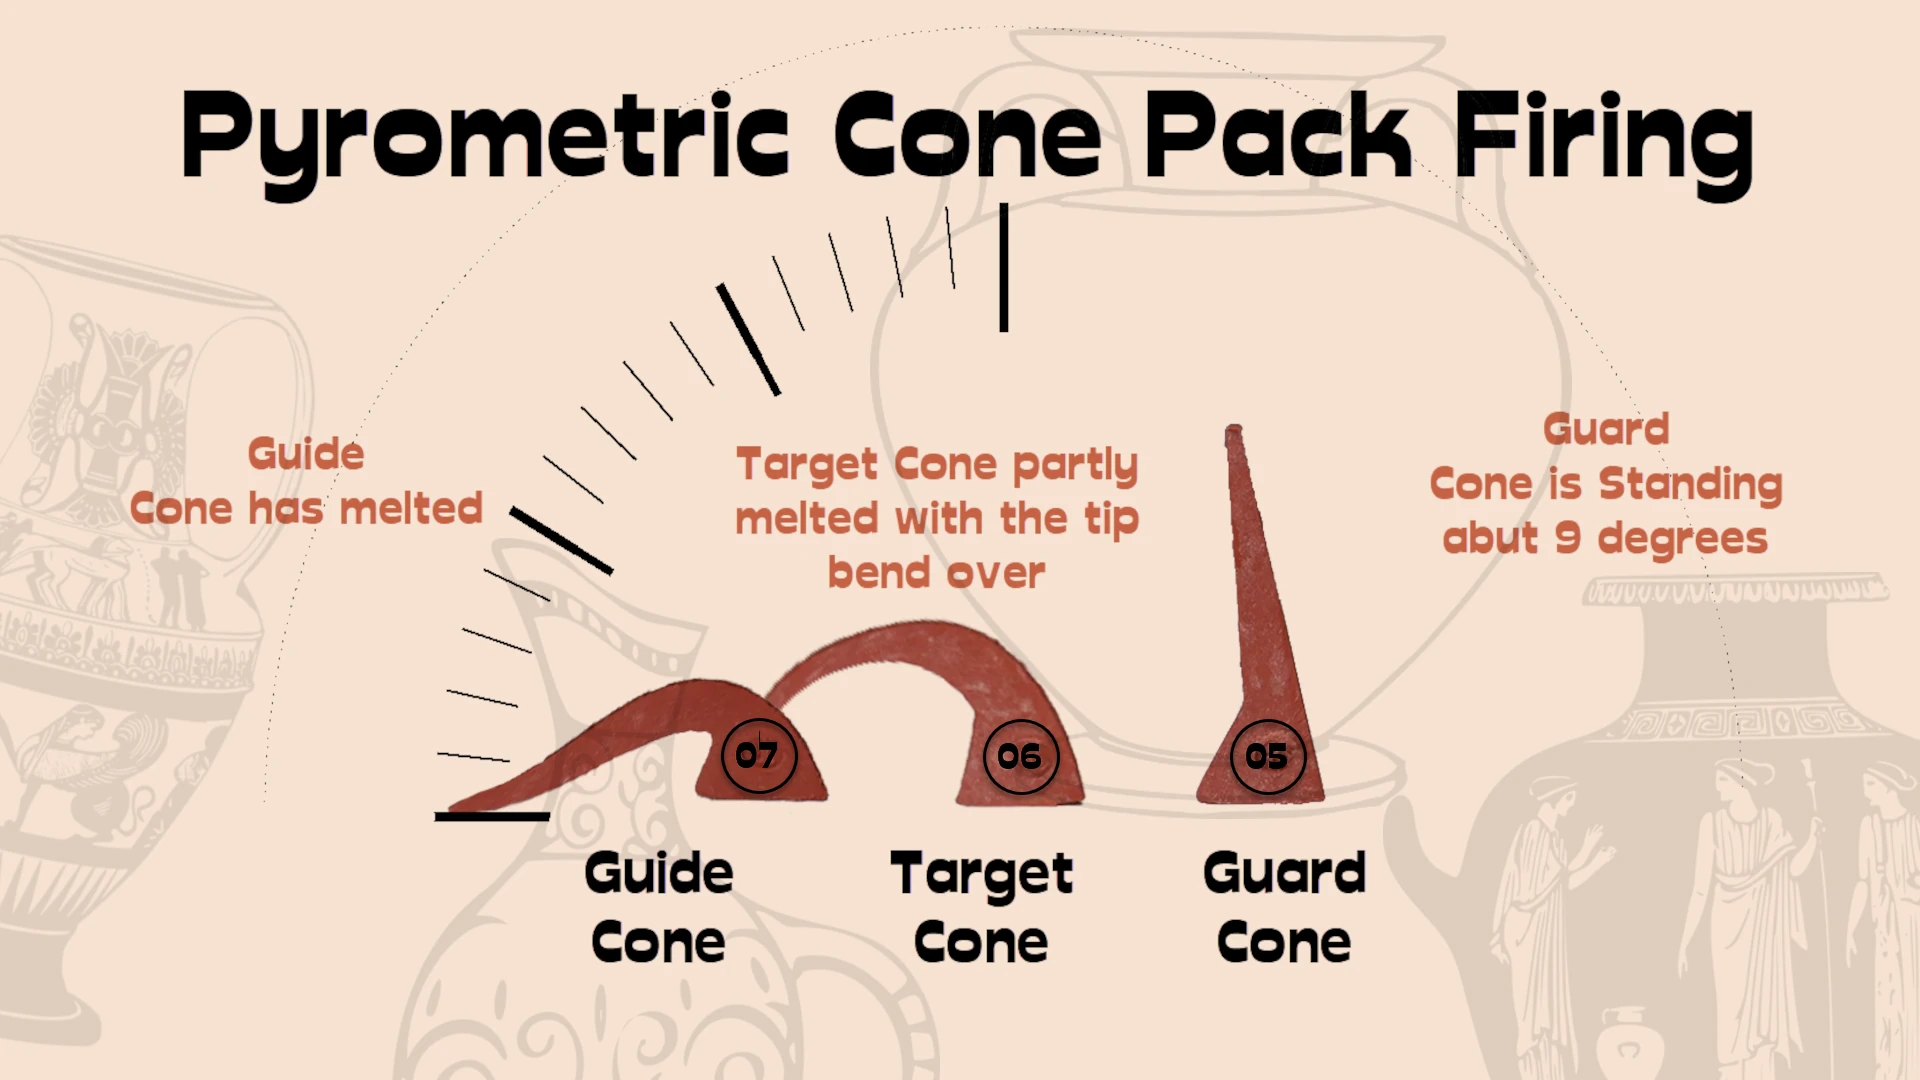
The target cone is located between the guide (First cone) and guard cone (last cone). On the rating system, a guide cone is one cone lower than a target cone. So, if your goal cone is 06, your guiding cone is 07, and vice versa. The guard cone is one cone higher, thus the guard cone, in this case, would be 05. So your cone pack would be 05, 06, and 07.
The guiding cone melts before the target cone does. And, the guard cone will not melt if the ceramics have received the appropriate amount of heatwork. If the guard cone melts and cone bends, it means your pottery was over-fired.
When using self-supporting cones, the cone should bend, such that its tip is level with the top edge of the supportive base. You can put a self-supporting cone in a cone pack for ease of use.
Cone Firing Tip: Despite the fact that cones from various manufacturers may have similar numbering schemes, their properties are not equal. When switching from one manufacturer to another, it’s often essential to make adjustments for the variations.
Cone Pack Assembly Instructions
Large cones, like self-supporting cones, are typically used in groups of three. When three big cones are placed in a cone holder, they form what is known as a cone pack.
Make a clay roll approximately one-half to one inch wide. Remember to select clay that can be fired at a high enough temperature. So, for example, if you are firing Earthenware clay pots, then you will want your cone pack to match.
Firing a cone pack made of Earthenware clay when firing “high fire” clay pots will result in your cone pack completely melting. Not a good idea. I manufacture my cone packs using the same clay that I used to make my ceramics.
Create a Boat in Your Cone Pack
Also, make sure your cone pack will be large enough to catch the melting cones. You do not want your cones melting all over your kiln hardware. Many potters will create what they call a boat. This is an area at the end of the cone pack that is designed to catch any melting cones. This saves your kiln hardware. Who wants a melted puddle of clay on their kiln shelves?
Cone Firing Tip: It’s a good idea to have several cone packs preassembled, dry, and ready to use. By having cone packs ready, you reduce the rise they will explode in your kiln. You may choose to buy more than one cone pack at a time especially if you can catch them on sale (depending on stock on hand).
Many potters will poke tiny holes in the cone pack or cone holder. This technique will let your cone pack dry out and keep it from exploding in your kiln. Another great idea is to bisque your cone pack.
Where To Place Pyrometric Cones In Your Kiln?
Each cone will have a longer side, often known as a spine. When put on the table, the cone will tilt at an 8-degree angle away from its longest side.
Make sure the cones are positioned in ascending order and the distance between cones will allow the cone to bend, usually about one-half an inch. Cones are in a bent position approximately 9 degrees so that when the temperature is applied, they will bend in the same direction. Enough space should be between cones or they are angles so that they are not melting all over each other.
You can align the spines so that the cones are not directly aligned with each other. This ensures they will not melt on top of each other. If a cone melts on top of another one it will be difficult to see how much the cone had bent or melted. Therefore, it will be impossible to confirm kiln temperatures and measure heatwork.
Cone Firing Tip: The temperature in most kilns varies from top to bottom. The variation in size is determined by the kiln’s design, the age of the heating elements, the kiln’s load distribution, and the cone number to which it is burned. At colder cone numbers, kilns usually have a higher temperature differential. To assess how much difference occurs during fire, cones should be put on the lowest, middle, and top shelves. This will help to decrease the difference in the way the kiln is loaded and burned. The use of downdraft venting will also help to balance out temperature variations.
How To Evaluate Cones After A Firing
After I fire my artwork, I look at my cone pack. My kiln does not have a peephole, therefore I have to evaluate after firing. If my kiln had a peephole, I could evaluate the heatwork, as it happens, by inspecting the cone pack during firing.
Cone Firing Tip: Self-supporting or big cones in a cone pack are inserted into the kiln and observed through the peephole. Attempts should be made to maintain consistent placement from firing to firing. Keeping and labeling some of your spent cone packs might help you track your firing outcomes over time.
After firing, the first cone in the cone pack should be melted. This is expected since this is the guide cone and has lower heatwork requirements than the target cone. The target cone should be partly melted with the tip bend over about level with its base. And the guard cone, the last cone in the pack, should be not melted at all and standing at about nine degrees.
Safety First When Evaluating Cones Using a Peephole
Glass kiln safety glasses are required while staring into a hot kiln because kilns emit infrared radiation that can damage the eyes. To protect the eyes from harmful radiation, special-purpose sunglasses are necessary. When making a purchase pay special attention to the product description to ensure your eyes are protected from infrared radiation.
Long-term exposure to infrared radiation can cause cataracts, which can appear years after the first exposure. Welder’s glasses, which generally have a rating number that indicates their capacity to filter hazardous rays, can be worn. Wearing regular sunglasses will provide no protection.
References
For more information lookup or see Orton Cone Chart Celsius, Cone Temperature
Hsieh, P. Y. (2019). Effects of temperature non‐uniformity and effective viscosity on pyrometric cone deformation. International Journal of Ceramic Engineering & Science, 1(4), 216-226. ceramics.onlinelibrary.wiley.com/doi/full/10.1002/ces2.10026
Vukovich Jr, M., & Fronk, D. A. (1990). The role of pyrometric cones and temperature in the firing process. Ceramic Manufacturing Council–Kilns and Firing: Ceramic Engineering and Science Proceedings, 1905-1921. ceramics.onlinelibrary.wiley.com/doi/abs/10.1002/9780470313107.ch24
Rawson, P. (1984). Ceramics (Vol. 6). University of Pennsylvania Press. https://books.google.com/books?hl=en&lr=&id=1e79xqbRqEEC&oi=fnd&pg=PA1&dq=Is+Pottery+Art&ots=JYVyRyIXYR&sig=AQZbSLk4xQyCjy9e1dLnol83yQA#v=onepage&q=Is%20Pottery%20Art&f=false
Peterson, S., & Peterson, J. (2002). Working with clay. Laurence King Publishing. https://books.google.com/books?hl=en&lr=&id=hJ4BOhm-XicC&oi=fnd&pg=PA8&dq=How+To+Wedge+Clay&ots=sqI8oBwnGm&sig=NnNyDhF8yak-UJJ5I-QHkp99uJU#v=onepage&q=How%20To%20Wedge%20Clay&f=false
